WELCOME to My Shop Commodity, Competitive Price, Customer First
Your business with me will be a pleasant experience for you. I am dedicated to bring joy, safe and top-quality products for you. All the products I offer in my store come with fashion style, superior quality but cheaper price all the time. When you place order, please do not hesitate to leave more detailed requirements you want, and then I will arrange the goods for you as soon as possible. First time, we do business; next time, we become friends. Hope you enjoy the whole process!


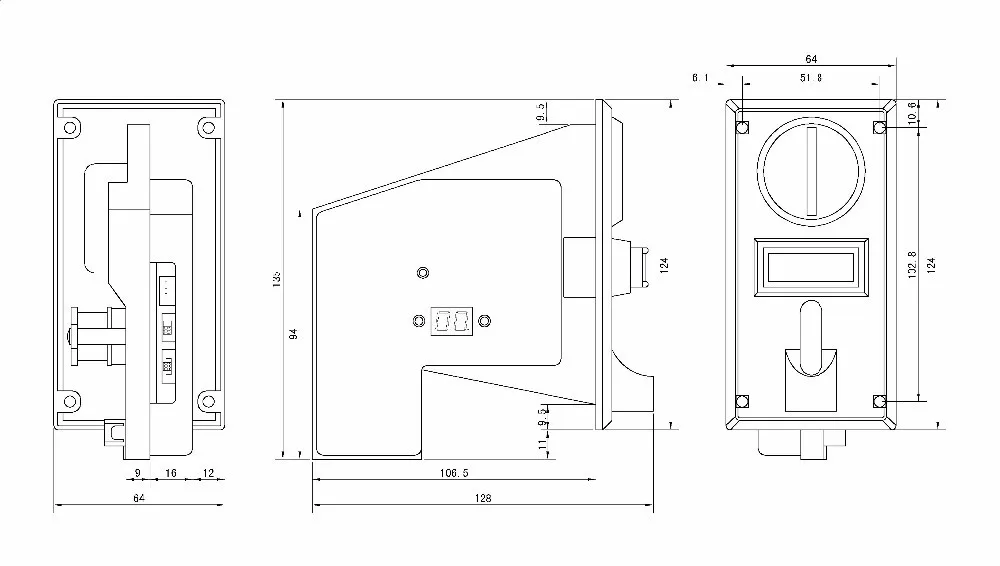
SETTING FOR COINS
- Hold on the button"ADD" and the button "MINUS" simultaneously for seconds,then letter "A" will appear from the LED display.
- Hold on the button "SET" for seconds, and letter "E" will appear. Next, use the button "ADD" and the button "MINUS" to choose how many kinds of coins you would like to use. Next, hold on the button "SET" for seconds to finish.
- Letter "H1" will appear. Use the button "ADD" and the button "MINUS" to choose how many samples you would like to insert later. Next, hold on the button "SET" for seconds to finish.
The maximum is 30. Please choose more than 15 samples for more accurate.
- Letter "P1" will appear. Use the button "ADD" and the button "MINUS" to choose the amount of output's signals/pulses for coins. Next, hold on the button "SET" for seconds to finish.
The maximum pulse is 50.
- Letter "F1" will appear. Use the button "ADD" and the button "MINUS" to choose accuracy. Next, hold on the button "SET" for seconds to finish.
The value is from 1 to 30, and 1 is the most accurate. Normally,5-10 is fine. If kinds of coins are too similar, the value should be more accurate.
- The first kind of coin has been set up so far. Please repeat No.3- No.5 until all kinds of coins has been set up. Letter "A" will appear again after all above procedures is finished.
- Hold on the button " SET" for seconds, and letter "E" will appear. Finally, turn off and turn on the power. The setting will be saved.
Sampling FOR COINS
You can start sampling after the setting is finished. Please choose more than 15 coins. The sampling will affect the accuracy of coin selector.
----------------------------------------------------------------------------------------------------
- Hold on the button "SET" for seconds, then letter "A1" will appear from the LED display.
- Please start to sample the first kind of coins. The letter "A1" will appear again after finished.
- Hold on the button "SET" for seconds, then letter "A2" will appear. Next, please start to sample second kind of coins. The letter "A2" will appear again after finished.
- Please repeat No.3 until all kinds of coins you need is set up.
If you already set up all kinds of coins you need, and it is less than the product has, please turn off power. For example: If you choose "6-kind-of-coin of multi-coin selector" to set up 4 types of coins, please turn off power after you see second “A4”.
- The system will restart automatically after finished.
- The product can be used after finishing sampling.
AP MODE
- Using this mode, you are able to control the output pulse ratios.
For example: 2 coins for 1 pulse or 3 coins for 1 pulse.
- If you don't need to use AP mode, please skip AP mode setting.
-----------------------------------------------------------------------------------------------
SETTING FOR AP MODE
- Please hold on the button "SET" and the button "ADD" simultaneously for seconds, then hold on the button "SET" for seconds to get into AP mode
- Please select the value of AP mode. The coin selector will generate 1 external signal output when the internal signal- "P" value of parameter- reaches the value
- The default value of AP mode is 1
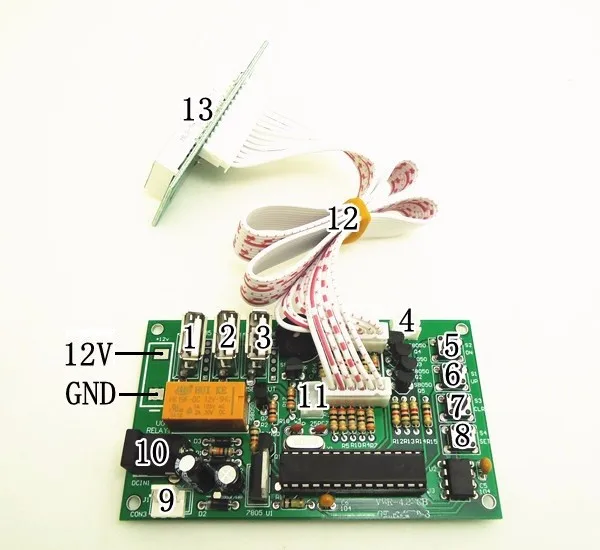
USB Timer Board

How it works
(1) user insert coin-> time runs and supply power to device->cut off power after time's up
(2) user insert coin-> time runs and supply power to device after pushing button start ->cut off power after time's up.
Note: Time is added automatically if user insert coin when time is running.
- Free to controls up to 2 sets of USB device.
- Free to set up time, value, given time, time for warning sound, and operated mode
- Please reference to "ATTACHMENT 1" FOR OPERATED MODE DETAIL
- Time is accumulative
- Free to connect button for start and pause
- Free to adjust coin operated mode by mode setting based on ATTACHMENT 1.
- 1 input, 2 output
- Free to connect 12V and GND to power converter
Connection and Position
1: USB input
2-3: USB output
4: Pausing
5-8: Button S2, S1, S3, and S4
9: YELLOW: DC12V, WHITE: input signal, BLACK: GND
10: AC jack-5.5mm*2.1mm
11: Push button for coin mode 01:02
12:40cm white lead
13: Display
Price and Time Setting
Note:
- GIVEN TIME and VALUE: User can get extra free time when the amount reach the value you have set up during the working time.
- If the function of GIVEN TIME is not needed, please skip step 4-step 6 by press button S4.
1. Please press button "S4", and then please use button "S1" and button "S2" to set up VALUE.
2. Please press button "S4", and then use button "S1" and "S2" to set up TIME for FIRST 2 NUMBER (00:--)
3. Please press button "S4", and then use button "S1" and "S2" to set up TIME for LAST 2 NUMBER (--:00)
4. Please press button "S4", and then use button "S1" and "S2" to set up VALUE OF GIVEN TIME.
5. Please press button "S4". Use button "S1" and "S2" to set up GIVEN TIME for FIRST 2 NUMBER (00:--)
6. Please press button "S4". Use button "S1" and "S2" to set up GIVEN TIME for LAST 2 NUMBER. (--:00)
7. Please press button "S4". Use button "S1" and "S2" to set up TIME for WARNING SOUND
Default is 30 seconds.
SAMPLE FOR CONNECTION


 USD
USD EUR
EUR GBP
GBP CAD
CAD AUD
AUD CHF
CHF HKD
HKD JPY
JPY